Dialogs are useful GUI components that allow you to communicate with the user (hence the name dialog). They are commonly used for file Open/Save, settings, preferences, or for functions that do not fit into the main UI of the application. They are small modal (or blocking) windows that sit in front of the main application until they are dismissed. Qt provides a number of 'special' built-in dialogs for the most common use-cases, allowing you to provide a platform-native user experience.
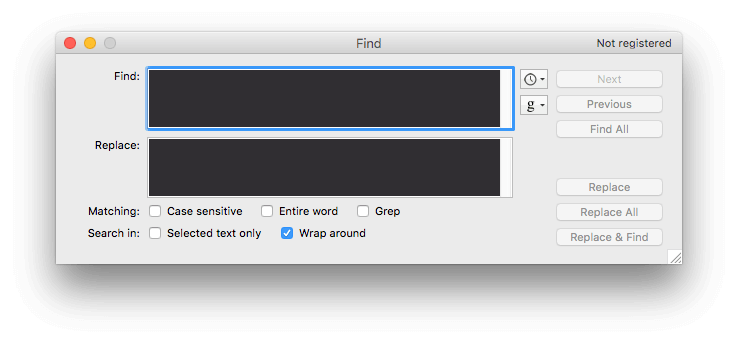 Standard GUI features — A search dialog
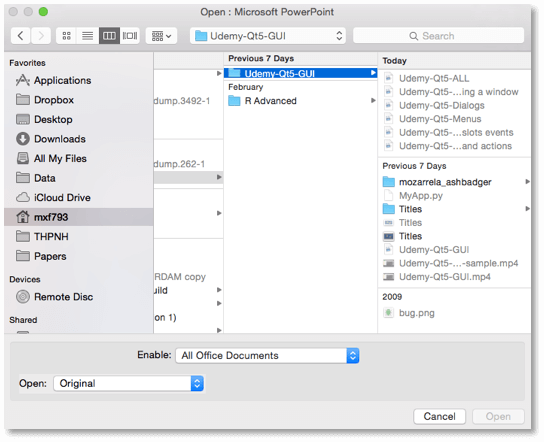 Standard GUI features — A file Open dialog
In Qt dialog boxes are handled by the QDialog class. To create a new dialog box simply create a new object of QDialog type passing in another widget, e.g. QMainWindow, as its parent.
Let's create our own QDialog. We'll start with a simple skeleton app with a button to press hooked up to a slot method.
import sys

from PyQt5.QtWidgets import QApplication, QMainWindow, QPushButton


class MainWindow(QMainWindow):
    def __init__(self):
        super().__init__()

        self.setWindowTitle("My App")

        button = QPushButton("Press me for a dialog!")
        button.clicked.connect(self.button_clicked)
        self.setCentralWidget(button)

    def button_clicked(self, s):
        print("click", s)


app = QApplication(sys.argv)

window = MainWindow()
window.show()

app.exec()
In the slot button_clicked (which receives the signal from the button press) we create the dialog instance, passing our QMainWindow instance as a parent. This will make the dialog a modal window of QMainWindow. This means the dialog will completely block interaction with the parent window.
import sys

from PyQt5.QtWidgets import QApplication, QDialog, QMainWindow, QPushButton


class MainWindow(QMainWindow):
    def __init__(self):
        super().__init__()

        self.setWindowTitle("My App")

        button = QPushButton("Press me for a dialog!")
        button.clicked.connect(self.button_clicked)
        self.setCentralWidget(button)

    def button_clicked(self, s):
        print("click", s)

        dlg = QDialog(self)
        dlg.setWindowTitle("HELLO!")
        dlg.exec()


app = QApplication(sys.argv)

window = MainWindow()
window.show()

app.exec()
Run it! Click the button and you'll see an empty dialog appear.
Once we have created the dialog, we start it using .exec() - just like we did for QApplication to create the main event loop of our application. That’s not a coincidence: when you exec the QDialog an entirely new event loop - specific for the dialog - is created.
The QDialog completely blocks your application execution. Don't start a dialog and expect anything else to happen anywhere else in your app. We'll see later how you can use threads & processes to get you out of this pickle.
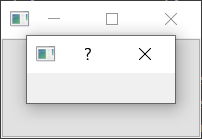 Our empty dialog overlaying the window.
Like our very first window, this isn't very interesting. Let's fix that by adding a dialog title and a set of OK and Cancel buttons to allow the user to accept or reject the modal.
To customize the QDialog we can subclass it.
class CustomDialog(QDialog):
    def __init__(self):
        super().__init__()

        self.setWindowTitle("HELLO!")

        QBtn = QDialogButtonBox.Ok | QDialogButtonBox.Cancel

        self.buttonBox = QDialogButtonBox(QBtn)
        self.buttonBox.accepted.connect(self.accept)
        self.buttonBox.rejected.connect(self.reject)

        self.layout = QVBoxLayout()
        message = QLabel("Something happened, is that OK?")
        self.layout.addWidget(message)
        self.layout.addWidget(self.buttonBox)
        self.setLayout(self.layout)
In the above code, we first create our subclass of QDialog which we've called CustomDialog. As for the QMainWindow we apply our customizations in the class __init__ block so our customizations are applied as the object is created. First we set a title for the QDialog using .setWindowTitle(), exactly the same as we did for our main window.
The next block of code is concerned with creating and displaying the dialog buttons. This is probably a bit more involved than you were expecting. However, this is due to Qt's flexibility in handling dialog button positioning on different platforms.
You could of course choose to ignore this and use a standard QButton in a layout, but the approach outlined here ensures that your dialog respects the host desktop standards (OK on left vs. right for example). Messing around with these behaviors can be incredibly annoying to your users, so I wouldn't recommend it.
The first step in creating a dialog button box is to define the buttons want to show, using namespace attributes from QDialogButtonBox. The full list of buttons available is below.
QDialogButtonBox.OkQDialogButtonBox.OpenQDialogButtonBox.SaveQDialogButtonBox.CancelQDialogButtonBox.CloseQDialogButtonBox.DiscardQDialogButtonBox.ApplyQDialogButtonBox.ResetQDialogButtonBox.RestoreDefaultsQDialogButtonBox.HelpQDialogButtonBox.SaveAllQDialogButtonBox.YesQDialogButtonBox.YesToAllQDialogButtonBox.NoQDialogButtonBox.AbortQDialogButtonBox.RetryQDialogButtonBox.IgnoreQDialogButtonBox.NoButton
These should be sufficient to create any dialog box you can think of. You can construct a line of multiple buttons by OR-ing them together using a pipe (|). Qt will handle the order automatically, according to platform standards. For example, to show an OK and a Cancel button we used:
buttons = QDialogButtonBox.Ok | QDialogButtonBox.Cancel
The variable buttons now contains an integer value representing those two buttons. Next, we must create the QDialogButtonBox instance to hold the buttons. The flag for the buttons to display is passed in as the first parameter.
To make the buttons have any effect, you must connect the correct QDialogButtonBox signals to the slots on the dialog. In our case we've connected the .accepted and .rejected signals from the QDialogButtonBox to the handlers for .accept() and .reject() on our subclass of QDialog.
Lastly, to make the QDialogButtonBox appear in our dialog box we must add it to the dialog layout. So, as for the main window we create a layout, and add our QDialogButtonBox to it (QDialogButtonBox is a widget), and then set that layout on our dialog.
Finally, we launch the CustomDialog in our MainWindow.button_clicked slot.
class MainWindow(QMainWindow):

    # ... add the following method after the __init__

    def button_clicked(self, s):
        print("click", s)

        dlg = CustomDialog()
        if dlg.exec():
            print("Success!")
        else:
            print("Cancel!")
Run it! Click to launch the dialog and you will see a dialog box with buttons.
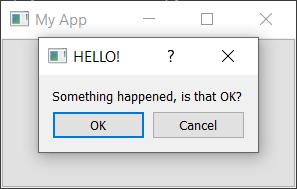
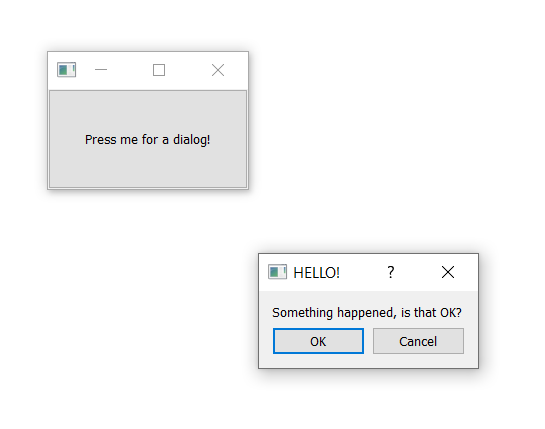 Our dialog with a label and buttons.
When you click the button to launch the dialog, you may notice that it appears away from the parent window -- probably in the center of the screen. Normally you want dialogs to appear over their launching window to make them easier for users to find. To do this we need to give Qt a parent for the dialog. If we pass our main window as the parent, Qt will position the new dialog so that the center of the dialog aligns with the center of the window.
We can modify our CustomDialog class to accept a parent parameter.
class CustomDialog(QDialog):
    def __init__(self, parent=None):
        super().__init__(parent)

        self.setWindowTitle("HELLO!")

        QBtn = QDialogButtonBox.Ok | QDialogButtonBox.Cancel

        self.buttonBox = QDialogButtonBox(QBtn)
        self.buttonBox.accepted.connect(self.accept)
        self.buttonBox.rejected.connect(self.reject)

        self.layout = QVBoxLayout()
        message = QLabel("Something happened, is that OK?")
        self.layout.addWidget(message)
        self.layout.addWidget(self.buttonBox)
        self.setLayout(self.layout)
We set a default value of parent=None so we can omit the parent if we wish.
Then, when we create our instance of CustomDialog we can pass the main window in as a parameter. In our button_clicked method, self is our main window object.
    def button_clicked(self, s):
        print("click", s)

        dlg = CustomDialog(self)
        if dlg.exec():
            print("Success!")
        else:
            print("Cancel!")
Run it! Click to launch the dialog and you should see the dialog pop up right in the middle of the parent window.
 Our dialog, centered over the parent window.
Congratulations! You've created your first dialog box. Of course, you can continue to add any other content to the dialog box that you like. Simply insert it into the layout as normal.
Simple message dialogs with QMessageBox
There are many dialogs which follow the simple pattern we just saw -- a message with buttons with which you can accept or cancel the dialog. While you can construct these dialogs yourself, Qt also provides a built-in message dialog class called QMessageBox. This can be used to create information, warning, about or question dialogs.
The example below creates a simple QMessageBox and shows it.
import sys

from PyQt5.QtWidgets import QApplication, QDialog, QMainWindow, QMessageBox, QPushButton


class MainWindow(QMainWindow):
    def __init__(self):
        super().__init__()

        self.setWindowTitle("My App")

        button = QPushButton("Press me for a dialog!")
        button.clicked.connect(self.button_clicked)
        self.setCentralWidget(button)

    def button_clicked(self, s):
        dlg = QMessageBox(self)
        dlg.setWindowTitle("I have a question!")
        dlg.setText("This is a simple dialog")
        button = dlg.exec()

        if button == QMessageBox.Ok:
            print("OK!")

app = QApplication(sys.argv)

window = MainWindow()
window.show()

app.exec()
Run it! You'll see a simple dialog with an OK button.
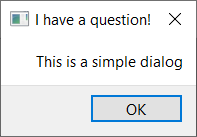 A QMessageBox dialog.
As with the dialog button box we looked at already, the buttons shown on a QMessageBox are also configured with the same set of constants which can be combined with | (the binary OR operator) to show multiple buttons. The full list of available button types is shown below.
QMessageBox.OkQMessageBox.OpenQMessageBox.SaveQMessageBox.CancelQMessageBox.CloseQMessageBox.DiscardQMessageBox.ApplyQMessageBox.ResetQMessageBox.RestoreDefaultsQMessageBox.HelpQMessageBox.SaveAllQMessageBox.YesQMessageBox.YesToAllQMessageBox.NoQMessageBox.NoToAllQMessageBox.AbortQMessageBox.RetryQMessageBox.IgnoreQMessageBox.NoButton
You can also tweak the icon shown on the dialog by setting the icon with one of the following.
| Icon state | Description |
|---|---|
QMessageBox.NoIcon |
The message box does not have an icon. |
QMessageBox.Question |
The message is asking a question. |
QMessageBox.Information |
The message is informational only. |
QMessageBox.Warning |
The message is warning. |
QMessageBox.Critical |
The message indicates a critical problem. |
For example, the following creates a question dialog with Yes and No buttons.
    def button_clicked(self, s):
        dlg = QMessageBox(self)
        dlg.setWindowTitle("I have a question!")
        dlg.setText("This is a question dialog")
        dlg.setStandardButtons(QMessageBox.Yes | QMessageBox.No)
        dlg.setIcon(QMessageBox.Question)
        button = dlg.exec()

        if button == QMessageBox.Yes:
            print("Yes!")
        else:
            print("No!")
Run it! You'll see a question dialog with Yes and No buttons.
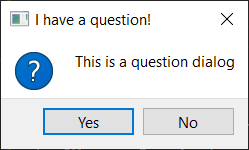 Question dialog created using QMessageBox.
Built in QMessageBox dialogs
To make things even simpler the QMessageBox has a number of methods which can be used to construct these types of message dialog. These methods are shown below --
QMessageBox.about(parent, title, message)
QMessageBox.critical(parent, title, message)
QMessageBox.information(parent, title, message)
QMessageBox.question(parent, title, message)
QMessageBox.warning(parent, title, message)
The parent parameter is the window which the dialog will be a child of. If you're launching your dialog from your main window, you can just pass in self.
The following example creates a question dialog, as before, with Yes and No buttons.
    def button_clicked(self, s):

        button = QMessageBox.question(self, "Question dialog", "The longer message")

        if button == QMessageBox.Yes:
            print("Yes!")
        else:
            print("No!")
Run it! You'll see the same result, this time using the built in .question() method.
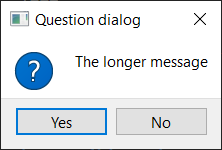 The built-in question dialog.
Notice that rather than call exec() we now simply call the dialog method and the dialog is created. The return value of each of the methods is the button which was pressed. We can detect what has been pressed by comparing the return value to the button constants.
The four information, question, warning and critical methods also accept optional buttons and defaultButton arguments which can be used to tweak the buttons shown on the dialog and select one by default. Generally though you don't want to change this from the default.
    def button_clicked(self, s):

        button = QMessageBox.critical(
            self,
            "Oh dear!",
            "Something went very wrong.",
            buttons=QMessageBox.Discard | QMessageBox.NoToAll | QMessageBox.Ignore,
            defaultButton=QMessageBox.Discard,
        )

        if button == QMessageBox.Discard:
            print("Discard!")
        elif button == QMessageBox.NoToAll:
            print("No to all!")
        else:
            print("Ignore!")
Run it! You'll see a critical dialog with customized buttons.
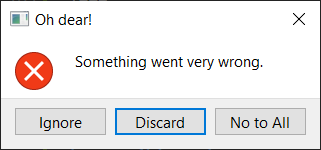 Critical error! This is a terrible dialog.
For most situations these simple dialogs are all you need.

Also available from Leanpub and Amazon Paperback
