There is not much fun in creating your own desktop applications if you can't share them with other people — whether than means publishing it commercially, sharing it online or just giving it to someone you know. Sharing your apps allows other people to benefit from your hard work!
The good news is there are tools available to help you do just that with your Python applications which work well with apps built using PyQt5. In this tutorial we'll look at the most popular tool for packaging Python applications: PyInstaller.
This tutorial is broken down into a series of steps, using PyInstaller to build first simple, and then increasingly complex PyQt5 applications into distributable EXE files on Windows. You can choose to follow it through completely, or skip ahead to the examples that are most relevant to your own project.
We finish off by using InstallForge to create a distributable Windows installer.
You always need to compile your app on your target system. So, if you want to create a Mac .app you need to do this on a Mac, for an EXE you need to use Windows.
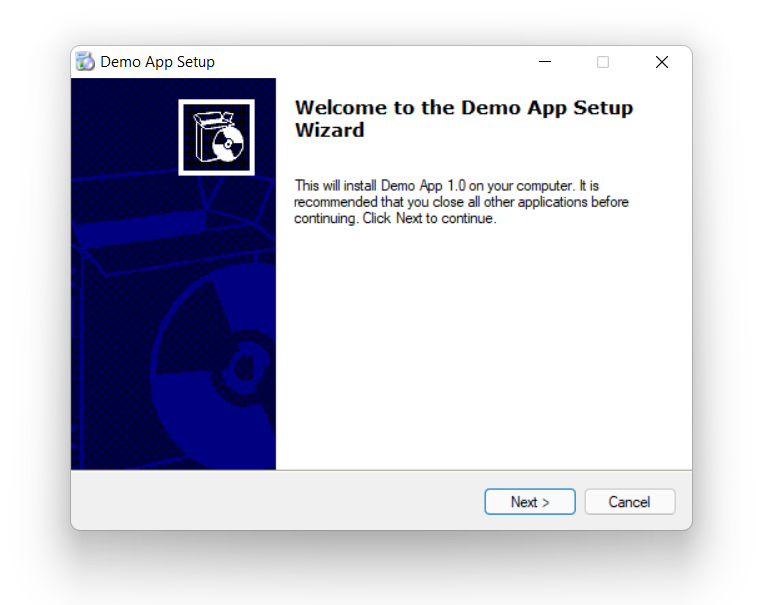 Example Installer for Windows
If you're impatient, you can download the Example Installer for Windows first.
Requirements
PyInstaller works out of the box with PyQt5 and as of writing, current versions of PyInstaller are compatible with Python 3.6+. Whatever project you're working on, you should be able to package your apps.
You can install PyInstaller using pip.
pip3 install PyInstaller
If you experience problems packaging your apps, your first step should always be to update your PyInstaller and hooks package the latest versions using
pip3 install --upgrade PyInstaller pyinstaller-hooks-contrib
The hooks module contains package-specific packaging instructions for PyInstaller which is updated regularly.
Install in virtual environment (optional)
You can also opt to install PyQt5 and PyInstaller in a virtual environment (or your applications virtual environment) to keep your environment clean.
python3 -m venv packenv
Once created, activate the virtual environment by running from the command line —
call packenv\scripts\activate.bat
Finally, install the required libraries. For PyQt5 you would use —
pip3 install PyQt5 PyInstaller
Getting Started
It's a good idea to start packaging your application from the very beginning so you can confirm that packaging is still working as you develop it. This is particularly important if you add additional dependencies. If you only think about packaging at the end, it can be difficult to debug exactly where the problems are.
For this example we're going to start with a simple skeleton app, which doesn't do anything interesting. Once we've got the basic packaging process working, we'll extend the application to include icons and data files. We'll confirm the build as we go along.
To start with, create a new folder for your application and then add the following skeleton app in a file named app.py. You can also download the source code and associated files
from PyQt5 import QtWidgets

import sys

class MainWindow(QtWidgets.QMainWindow):

    def __init__(self):
        super().__init__()

        self.setWindowTitle("Hello World")
        l = QtWidgets.QLabel("My simple app.")
        l.setMargin(10)
        self.setCentralWidget(l)
        self.show()

if __name__ == '__main__':
    app = QtWidgets.QApplication(sys.argv)
    w = MainWindow()
    app.exec()
This is a basic bare-bones application which creates a custom QMainWindow and adds a simple widget QLabel to it. You can run this app as follows.
python app.py
This should produce the following window (on Windows 11).
 Simple skeleton app in PyQt5

Also available from Leanpub and Amazon Paperback
Purchasing Power Parity
Developers in [[ country ]] get [[ discount.discount_pc ]]% OFF on all books & courses with code [[ discount.coupon_code ]]Building a basic app
Now we have our simple application skeleton in place, we can run our first build test to make sure everything is working.
Open your terminal (command prompt) and navigate to the folder containing your project. You can now run the following command to run the PyInstaller build.
pyinstaller app.py
You'll see a number of messages output, giving debug information about what PyInstaller is doing. These are useful for debugging issues in your build, but can otherwise be ignored. The output that I get for running the command on Windows 11 is shown below.
U:\home\martin\helloworld>pyinstaller app.py
INFO: PyInstaller: 3.6
INFO: Python: 3.7.6
INFO: Platform: Windows-10-10.0.18362-SP0
INFO: wrote U:\home\martin\helloworld\app.spec
INFO: UPX is not available.
INFO: Extending PYTHONPATH with paths
['U:\\home\\martin\\helloworld', 'U:\\home\\martin\\helloworld']
INFO: checking Analysis
INFO: Building Analysis because Analysis-00.toc is non existent
INFO: Initializing module dependency graph...
INFO: Caching module graph hooks...
INFO: Analyzing base_library.zip ...
INFO: Caching module dependency graph...
INFO: running Analysis Analysis-00.toc
INFO: Adding Microsoft.Windows.Common-Controls to dependent assemblies of final executable
  required by c:\users\gebruiker\appdata\local\programs\python\python37\python.exe
INFO: Analyzing U:\home\martin\helloworld\app.py
INFO: Processing module hooks...
INFO: Loading module hook "hook-encodings.py"...
INFO: Loading module hook "hook-pydoc.py"...
INFO: Loading module hook "hook-PyQt5.py"...
WARNING: Hidden import "sip" not found!
INFO: Loading module hook "hook-PyQt5.QtWidgets.py"...
INFO: Loading module hook "hook-xml.py"...
INFO: Loading module hook "hook-PyQt5.QtCore.py"...
INFO: Loading module hook "hook-PyQt5.QtGui.py"...
INFO: Looking for ctypes DLLs
INFO: Analyzing run-time hooks ...
INFO: Including run-time hook 'pyi_rth_pyqt5.py'
INFO: Looking for dynamic libraries
INFO: Looking for eggs
INFO: Using Python library c:\users\gebruiker\appdata\local\programs\python\python37\python37.dll
INFO: Found binding redirects:
[]
INFO: Warnings written to U:\home\martin\helloworld\build\app\warn-app.txt
INFO: Graph cross-reference written to U:\home\martin\helloworld\build\app\xref-app.html
INFO: checking PYZ
INFO: Building PYZ because PYZ-00.toc is non existent
INFO: Building PYZ (ZlibArchive) U:\home\martin\helloworld\build\app\PYZ-00.pyz
INFO: Building PYZ (ZlibArchive) U:\home\martin\helloworld\build\app\PYZ-00.pyz completed successfully.
INFO: checking PKG
INFO: Building PKG because PKG-00.toc is non existent
INFO: Building PKG (CArchive) PKG-00.pkg
INFO: Building PKG (CArchive) PKG-00.pkg completed successfully.
INFO: Bootloader c:\users\gebruiker\appdata\local\programs\python\python37\lib\site-packages\PyInstaller\bootloader\Windows-64bit\run.exe
INFO: checking EXE
INFO: Building EXE because EXE-00.toc is non existent
INFO: Building EXE from EXE-00.toc
INFO: Appending archive to EXE U:\home\martin\helloworld\build\app\app.exe
INFO: Building EXE from EXE-00.toc completed successfully.
INFO: checking COLLECT
INFO: Building COLLECT because COLLECT-00.toc is non existent
INFO: Building COLLECT COLLECT-00.toc
INFO: Building COLLECT COLLECT-00.toc completed successfully.
If you look in your folder you'll notice you now have two new folders dist and build.
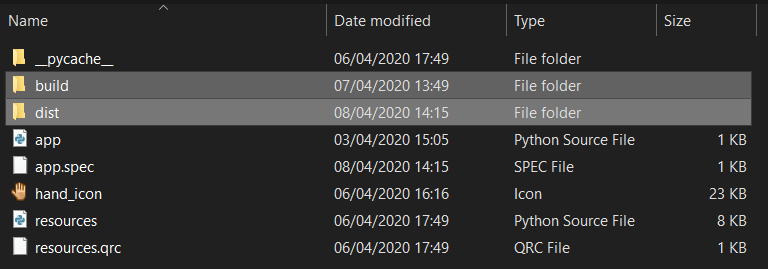 build & dist folders created by PyInstaller
Below is a truncated listing of the folder content, showing the build and dist folders.
.
├── app.py
├── app.spec
├── build
│   └── app
│       ├── Analysis-00.toc
│       ├── COLLECT-00.toc
│       ├── EXE-00.toc
│       ├── PKG-00.pkg
│       ├── PKG-00.toc
│       ├── PYZ-00.pyz
│       ├── PYZ-00.toc
│       ├── app.exe
│       ├── app.exe.manifest
│       ├── base_library.zip
│       ├── warn-app.txt
│       └── xref-app.html
└── dist
    └── app
        ├── MSVCP140.dll
        ├── PyQt5
        ├── app.exe
        ├── app.exe.manifest
        ├── Qt5Core.dll
        ...
The build folder is used by PyInstaller to collect and prepare the files for bundling, it contains the results of analysis and some additional logs. For the most part, you can ignore the contents of this folder, unless you're trying to debug issues.
The dist (for "distribution") folder contains the files to be distributed. This includes your application, bundled as an executable file, together with any associated libraries (for example PyQt5) and binary .dll files.
Everything necessary to run your application will be in this folder, meaning you can take this folder and "distribute" it to someone else to run your app.
You can try running your app yourself now, by running the executable file, named app.exe from the dist folder. After a short delay you'll see the familiar window of your application pop up as shown below.
Simple app, running after being packaged
You may also notice a console/terminal window pop up as your application runs. We'll cover how to stop that happening shortly.
In the same folder as your Python file, alongside the build and dist folders PyInstaller will have also created a .spec file. In the next section we'll take a look at this file, what it is and what it does.
The Spec file
The .spec file contains the build configuration and instructions that PyInstaller uses to package up your application. Every PyInstaller project has a .spec file, which is generated based on the command line options you pass when running pyinstaller.
When we ran pyinstaller with our script, we didn't pass in anything other than the name of our Python application file. This means our spec file currently contains only the default configuration. If you open it, you'll see something similar to what we have below.
# -*- mode: python ; coding: utf-8 -*-

block_cipher = None


a = Analysis(['app.py'],
             pathex=[],
             binaries=[],
             datas=[],
             hiddenimports=[],
             hookspath=[],
             runtime_hooks=[],
             excludes=[],
             win_no_prefer_redirects=False,
             win_private_assemblies=False,
             cipher=block_cipher,
             noarchive=False)
pyz = PYZ(a.pure, a.zipped_data,
             cipher=block_cipher)
exe = EXE(pyz,
          a.scripts,
          [],
          exclude_binaries=True,
          name='app',
          debug=False,
          bootloader_ignore_signals=False,
          strip=False,
          upx=True,
          console=True )
coll = COLLECT(exe,
               a.binaries,
               a.zipfiles,
               a.datas,
               strip=False,
               upx=True,
               upx_exclude=[],
               name='app')
The first thing to notice is that this is a Python file, meaning you can edit it and use Python code to calculate values for the settings. This is mostly useful for complex builds, for example when you are targeting different platforms and want to conditionally define additional libraries or dependencies to bundle.
If you generate a .spec file on Windows the path separator will be \\. To use this same .spec file on macOS you'll need to switch the separators to /. Thankfully / also works on Windows.
Once a .spec file has been generated, you can pass this to pyinstaller instead of your script to repeat the previous build process. Run this now to rebuild your executable.
pyinstaller app.spec
The resulting build will be identical to the build used to generate the .spec file (assuming you have made no changes). For many PyInstaller configuration changes you have the option of passing command-line arguments, or modifying your existing .spec file. Which you choose is up to you.
Tweaking the build
So far we've created a simple first build of a very basic application. Now we'll look at a few of the most useful options that PyInstaller provides to tweak our build. Then we'll go on to look at building more complex applications.
Naming your app
One of the simplest changes you can make is to provide a proper "name" for your application. By default the app takes the name of your source file (minus the extension), for example main or app. This isn't usually what you want.
You can provide a nicer name for PyInstaller to use for the executable (and dist folder) either by editing the .spec file to add a name= under the app block.
exe = EXE(pyz,
          a.scripts,
          [],
          exclude_binaries=True,
          name='Hello World',
          debug=False,
          bootloader_ignore_signals=False,
          strip=False,
          upx=True,
          console=False  # False = do not show console.
         )
Alternatively, you can re-run the pyinstaller command and pass the -n or --name configuration flag along with your app.py script.
pyinstaller -n "Hello World" app.py
# or
pyinstaller --name "Hello World" app.py
The resulting EXE file will be given the name Hello World.exe and placed in the folder dist\Hello World\.
 Application with custom name "Hello World"
The name of the .spec file is taken from the name passed in on the command line, so this will also create a new spec file for you, called Hello World.spec in your root folder.
Hiding the console window
When you run your packaged application you will notice that a console window runs in the background. If you try and close this console window your application will also close. You almost never want this window in a GUI application and PyInstaller provides a simple way to turn this off.
 Application running with terminal in background
You can fix this in one of two ways. Firstly, you can edit the previously created .spec file setting console=False under the EXE block as shown below.
exe = EXE(pyz,
          a.scripts,
          [],
          exclude_binaries=True,
          name='app',
          debug=False,
          bootloader_ignore_signals=False,
          strip=False,
          upx=True,
          console=False  # False = do not show console.
         )
Alternatively, you can re-run the pyinstaller command and pass the -w, --noconsole or --windowed configuration flag along with your app.py script.
pyinstaller -w app.py
# or
pyinstaller --windowed app.py
# or
pyinstaller --noconsole app.py
There is no difference between any of the options.
Re-running pyinstaller will re-generate the .spec file. If you've made any other changes to this file these will be lost.
One File Build
On Windows PyInstaller has the ability to create a one-file build, that is, a single EXE file which contains all your code, libraries and data files in one. This can be a convenient way to share simple applications, as you don't need to provide an installer or zip up a folder of files.
To specify a one-file build provide the --onefile flag at the command line.
pyinstaller --onefile app.py
 Result of a one-file build
Note that while the one-file build is easier to distribute, it is slower to execute than a normally built application. This is because every time the application is run it must create a temporary folder to unpack the contents of the executable. Whether this trade-off is worth the convenience for your app is up to you!
Using the --onefile option makes quite a few changes to the .spec file. You can make these changes manually, but it's much simpler to use the command line switch when first creating your .spec
Since debugging a one file app is much harder, you should make sure everything is working with a normal build before you create a one-file package. We're going to continue this tutorial with a folder-based build for clarity.
Setting an application Icon
By default PyInstaller EXE files come with the following icon in place.
![]() Default PyInstaller application icon, on app.exe
Default PyInstaller application icon, on app.exe
You will probably want to customize this to make your application more recognisable. This can be done easily using the --icon=<filename> command-line switch to PyInstaller. On Windows the icon should be provided as an .ico file.
pyinstaller --windowed --icon=hand.ico app.py
The portable version of IcoFx is a good free tool to create icons on Windows.
Or, by adding the icon= parameter to your .spec file.
exe = EXE(pyz,
          a.scripts,
          [],
          exclude_binaries=True,
          name='blarh',
          debug=False,
          bootloader_ignore_signals=False,
          strip=False,
          upx=True,
          console=False,
          icon='hand.ico')
If you now re-run the build (by using the command line arguments, or running with your modified .spec file) you'll see the specified icon file is now set on your application's EXE file.
![]() Custom application icon (a hand) on app.exe
Custom application icon (a hand) on app.exe
However, if you run your application, you're going to be disappointed.
![]() The custom EXE icon is not applied to the window
The custom EXE icon is not applied to the window
The specified icon is not showing up on the window, and it will also not appear on your taskbar.
Why not? Because the icon used for the window isn't determined by the icons in the executable file, but by the application itself. To show an icon on our window we need to modify our simple application a little bit, to add a call to .setWindowIcon().
from PyQt5 import QtWidgets, QtGui
import sys

class MainWindow(QtWidgets.QMainWindow):

    def __init__(self):
        super().__init__()

        self.setWindowTitle("Hello World")
        l = QtWidgets.QLabel("My simple app.")
        l.setMargin(10)
        self.setCentralWidget(l)

        self.show()

if __name__ == '__main__':
    app = QtWidgets.QApplication(sys.argv)
    app.setWindowIcon(QtGui.QIcon('hand.ico'))
    w = MainWindow()
    app.exec()
Here we've added the .setWindowIcon call to the app instance. This defines a default icon to be used for all windows of our application. You can override this on a per-window basis if you like, by calling .setWindowIcon on the window itself.
If you run the above application you should now see the icon appears on the window.
![]() Window showing the custom hand icon
Window showing the custom hand icon
Even if you don't see the icons, keep reading!
Dealing with relative paths
There is a gotcha here, which might not be immediately apparent. To demonstrate it, open up a shell and change to the folder where our script is located. Run it with
python3 app.py
If the icons are in the correct location, you should see them. Now change to the parent folder, and try and run your script again (change <folder> to the name of the folder your script is in).
cd ..
python3 <folder>/app.py
Window with icon missing.
The icons don't appear. What's happening?
We're using relative paths to refer to our data files. These paths are relative to the current working directory -- not the folder your script is in. So if you run the script from elsewhere it won't be able to find the files.
One common reason for icons not to show up, is running examples in an IDE which uses the project root as the current working directory.
This is a minor issue before the app is packaged, but once it's installed you don't know what the current working directory will be when it is run -- if it's wrong your app won't be able to find anything. We need to fix this before we go any further, which we can do by making our paths relative to our application folder.
In the updated code below, we define a new variable basedir, using os.path.dirname to get the containing folder of __file__ which holds the full path of the current Python file. We then use this to build the relative paths for icons using os.path.join().
Since our app.py file is in the root of our folder, all other paths are relative to that.
from PyQt5 import QtWidgets, QtGui
import sys, os

basedir = os.path.dirname(__file__)


class MainWindow(QtWidgets.QMainWindow):

    def __init__(self):
        super().__init__()

        self.setWindowTitle("Hello World")
        l = QtWidgets.QLabel("My simple app.")
        l.setMargin(10)
        self.setCentralWidget(l)
        self.show()

if __name__ == '__main__':
    app = QtWidgets.QApplication(sys.argv)
    app.setWindowIcon(QtGui.QIcon(os.path.join(basedir, 'hand.ico')))
    w = MainWindow()
    app.exec_()
Try and run your app again from the parent folder -- you'll find that the icon now appear as expected, no matter where you launch the app from.
Taskbar Icons
Unfortunately, even if the icon is showing on the window, it may still not show on the taskbar.
If it does for you, great! But it may not work when you distribute your application, so it's probably a good idea to follow the next steps anyway.
![]() Custom icon is not shown on the toolbar
Custom icon is not shown on the toolbar
The final tweak we need to make to get the icon showing on the taskbar is to add some cryptic incantations to the top of our Python file.
When you run your application, Windows looks at the executable and tries to guess what "application group" it belongs to. By default, any Python scripts (including your application) are grouped under the same "Python" group, and so will show the Python icon. To stop this happening, we need to provide Windows with a different application identifier.
The code below does this, by calling ctypes.windll.shell32.SetCurrentProcessExplicitAppUserModelID() with a custom application id.
from PyQt5 import QtWidgets, QtGui
import sys, os

basedir = os.path.dirname(__file__)

try:
    from ctypes import windll  # Only exists on Windows.
    myappid = 'mycompany.myproduct.subproduct.version'
    windll.shell32.SetCurrentProcessExplicitAppUserModelID(myappid)
except ImportError:
    pass


class MainWindow(QtWidgets.QMainWindow):

    def __init__(self):
        super().__init__()

        self.setWindowTitle("Hello World")
        l = QtWidgets.QLabel("My simple app.")
        l.setMargin(10)
        self.setCentralWidget(l)
        self.show()

if __name__ == '__main__':
    app = QtWidgets.QApplication(sys.argv)
    app.setWindowIcon(QtGui.QIcon(os.path.join(basedir, 'hand.ico')))
    w = MainWindow()
    app.exec()
The listing above shows a generic mycompany.myproduct.subproduct.version string, but you should change this to reflect your actual application. It doesn't really matter what you put for this purpose, but the convention is to use reverse-domain notation, com.mycompany for the company identifier.
With this added to your script, running it should now show the icon on your window and taskbar. The final step is to ensure that this icon is correctly packaged with your application and continues to be shown when run from the dist folder.
Try it, it wont.
The issue is that our application now has a dependency on a external data file (the icon file) that's not part of our source. For our application to work, we now need to distribute this data file along with it. PyInstaller can do this for us, but we need to tell it what we want to include, and where to put it in the output.
In the next section we'll look at the options available to you for managing data files associated with your app.
Data files and Resources
So far we successfully built a simple app which had no external dependencies. However, once we needed to load an external file (in this case an icon) we hit upon a problem. The file wasn't copied into our dist folder and so could not be loaded.
In this section we'll look at the options we have to be able to bundle external resources, such as icons or Qt Designer .ui files, with our applications.
Bundling data files with PyInstaller
The simplest way to get these data files into the dist folder is to just tell PyInstaller to copy them over. PyInstaller accepts a list of individual file paths to copy over, together with a folder path relative to the dist/<app name> folder where it should to copy them to.
As with other options, this can be specified by command line arguments, --add-data
pyinstaller --windowed --icon=hand.ico --add-data="hand.ico;." app.py
You can provide `--add-data` multiple times. Note that the path separator is platform-specific, on Windows use `;` while on Linux or Mac use `:`
Or via the datas list in the Analysis section of the spec file, shown below.
a = Analysis(['app.py'],
             pathex=[],
             binaries=[],
             datas=[('hand.ico', '.')],
             hiddenimports=[],
             hookspath=[],
             runtime_hooks=[],
             excludes=[],
             win_no_prefer_redirects=False,
             win_private_assemblies=False,
             cipher=block_cipher,
             noarchive=False)
And then execute the .spec file with
pyinstaller app.spec
In both cases we are telling PyInstaller to copy the specified file hand.ico to the location . which means the output folder dist. We could specify other locations here if we wanted. On the command line the source and destination are separated by the path separator ;, whereas in the .spec file, the values are provided as a 2-tuple of strings.
If you run the build, you should see your .ico file now in the output folder dist ready to be distributed with your application.
![]() The icon file copied to the dist folder
The icon file copied to the dist folder
If you run your app from dist you should now see the icon on the window, and on the taskbar as expected.
![]() The hand icon showing on the toolbar
The hand icon showing on the toolbar
The file must be loaded in Qt using a relative path, and be in the same relative location to the EXE as it was to the .py file for this to work.
If your icon looks blurry it means you don't have large-enough icon variations in your .ico file. An .ico file can contain multiple different sized icons in the same file. Ideally you want to have 16x16, 32x32, 48x48 and 256x256 pixel sizes included, although fewer will still work.
Bundling data folders
Usually you will have more than one data file you want to include with your packaged file. The latest PyInstaller versions let you bundle folders just like you would files, keeping the sub-folder structure. For example, lets extend our app to add some additional icons, and put them under a folder.
from PyQt5.QtWidgets import QMainWindow, QApplication, QLabel, QVBoxLayout, QPushButton, QWidget
from PyQt5.QtGui import QIcon
import sys, os

basedir = os.path.dirname(__file__)

try:
    from ctypes import windll  # Only exists on Windows.
    myappid = 'mycompany.myproduct.subproduct.version'
    windll.shell32.SetCurrentProcessExplicitAppUserModelID(myappid)
except ImportError:
    pass


class MainWindow(QMainWindow):

    def __init__(self):
        super().__init__()

        self.setWindowTitle("Hello World")
        layout = QVBoxLayout()
        label = QLabel("My simple app.")
        label.setMargin(10)
        layout.addWidget(label)

        button = QPushButton("Push")
        button.setIcon(QIcon(os.path.join(basedir, "icons", "lightning.png")))
        button.pressed.connect(self.close)
        layout.addWidget(button)

        container = QWidget()
        container.setLayout(layout)

        self.setCentralWidget(container)

        self.show()

if __name__ == '__main__':
    app = QApplication(sys.argv)
    app.setWindowIcon(QIcon(os.path.join(basedir, "icons", "hand.ico")))
    w = MainWindow()
    app.exec_()
The icons (PNG files and an ICO file for the Windows file icon) are stored under a subfolder named 'icons'.
.
├── app.py
└── icons
    └── lightning.png
    └── hand.png
    └── hand.ico
If you run this you'll see the following window, with a Window icon and a button icon.
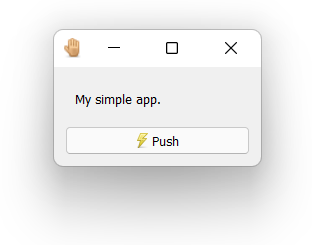 Window with two icons, and a button.
The paths are using the Unix forward-slash / convention, so they are cross-platform for macOS. If you're only developing for Windows, you can use \\
To copy the icons folder across to our build application, we just need to add the folder to our .spec file Analysis block. As for the single file, we add it as a tuple with the source path (from our project folder) and the destination folder under the resulting dist folder.
# -*- mode: python ; coding: utf-8 -*-


block_cipher = None


a = Analysis(['app.py'],
             pathex=[],
             binaries=[],
             datas=[('icons', 'icons')],   # tuple is (source_folder, destination_folder)
             hiddenimports=[],
             hookspath=[],
             hooksconfig={},
             runtime_hooks=[],
             excludes=[],
             win_no_prefer_redirects=False,
             win_private_assemblies=False,
             cipher=block_cipher,
             noarchive=False)
pyz = PYZ(a.pure, a.zipped_data,
             cipher=block_cipher)

exe = EXE(pyz,
          a.scripts,
          [],
          exclude_binaries=True,
          name='app',
          debug=False,
          bootloader_ignore_signals=False,
          strip=False,
          upx=True,
          console=False,
          disable_windowed_traceback=False,
          target_arch=None,
          codesign_identity=None,
          entitlements_file=None )
coll = COLLECT(exe,
               a.binaries,
               a.zipfiles,
               a.datas,
               strip=False,
               upx=True,
               upx_exclude=[],
               name='app')
If you run the build using this spec file you'll see the icons folder copied across to the dist folder. If you run the application from the folder, the icons will display as expected -- the relative paths remain correct in the new location.
Alternatively, you can bundle your data files using Qt's QResource architecture. See our tutorial for more information.
Packaging Python Applications with PyInstaller by Martin Fitzpatrick — This step-by-step guide walks you through packaging your own Python applications from simple examples to complete installers and signed executables.
Building a Windows Installer with InstallForge
So far we've used PyInstaller to bundle applications for distribution, along with the associated data files. The output of this bundling process is a folder, named dist which contains all the files our application needs to run.
While you could share this folder with your users as a ZIP file it's not the best user experience. Desktop applications are normally distributed with installers which handle the process of putting the executable (and any other files) in the correct place, adding Start Menu shortcuts and the like.
Now we've successfully bundled our application, we'll next look at how we can take our dist folder and use it to create a Windows installer.
Making sure the build is ready.
If you've followed the tutorial so far, you'll already have your app ready in the /dist folder. If not, or yours isn't working you can also download the source code files for this tutorial which includes a sample .spec file. As above, you can run the same build using the provided app.spec file.
pyinstaller app.spec
This packages everything up ready to distribute in the dist/app folder. Run the executable app.exe to ensure everything is bundled correctly, and you should the same window as before with icons visible.
Window with two icons, and a button.
The EXE section in the .spec has a name parameter where you can specify the name of the resulting EXE file. You may want to change this to the name of your application.
Creating an installer
Now we've successfully bundled our application, we'll next look at how we can take our dist folder and use it to create a functioning Windows installer.
To create our installer we'll be using a tool called InstallForge. InstallForge is free and you can download the installer from this page.
We'll now walk through the basic steps of creating an installer with InstallForge. If you're impatient, you can download the finished Installforge Installer here.
General
When you first run InstallForge you'll be presented with this General tab. Here you can enter the basic information about your application, including the name, program version, company and website.
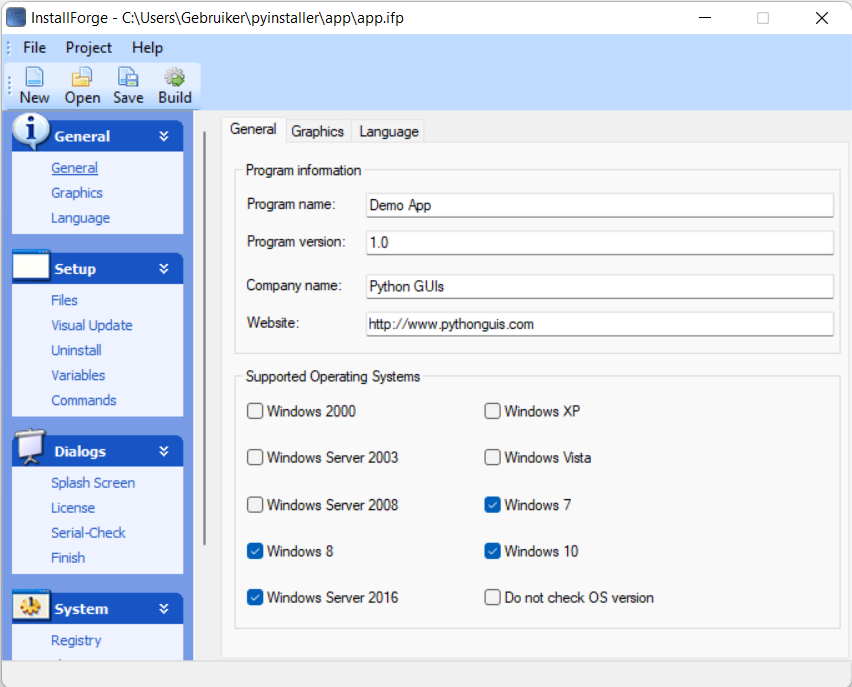 InstallForge initial view, showing General settings
You can also select the target platforms for the installer, from various versions of Windows that are available. For desktop applications you currently probably only want to target Windows 7, 8 and 10.
Setup
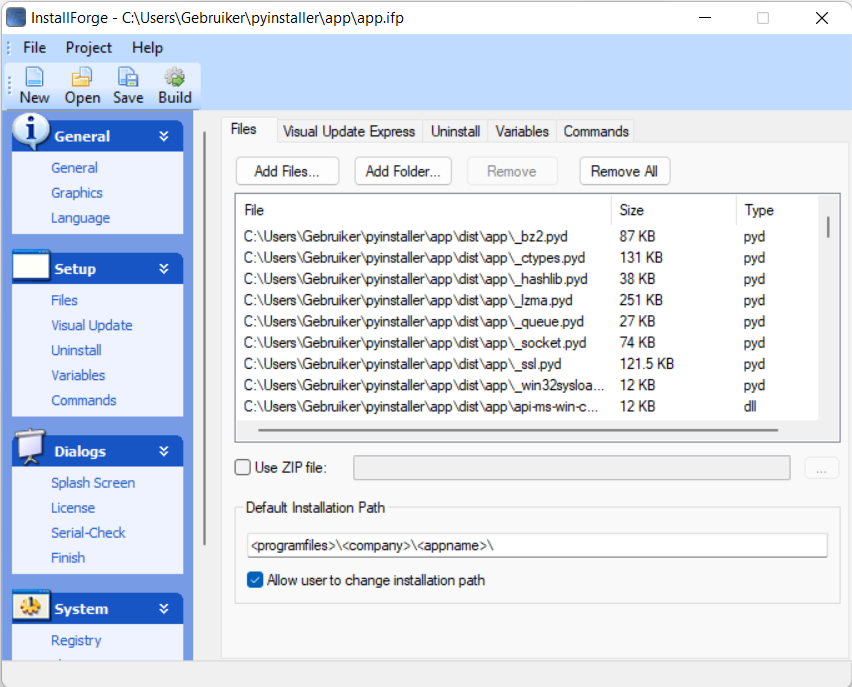
Click on the left sidebar to open the "Files" page under "Setup". Here you can specify the files to be bundled in the installer.
Use "Add Files…" and select all the files in the dist/app folder produced by PyInstaller. The file browser that pops up allows multiple file selections, so you can add them all in a single go, however you need to add folders separately. Click "Add Folder…" and add any folders under dist/app such as the PyQt5 folder and icons
 InstallForge Files view, add all files & folders to be packaged
Once you're finished scroll through the list to the bottom and ensure that the folders are listed to be included. You want all files and folders under dist/app to be present. But the folder dist/app itself should not be listed.
The default install path can be left as-is. The values between angled brackets, e.g. <company> , are variables and will be filled automatically.
Next, it's nice to allow your users to uninstall your application. Even though it's undoubtedly awesome, they may want to remove it at some time in the future. You can do this under the "Uninstall" tab, simply by ticking the box. This will also make the application appear in "Add or Remove Programs".
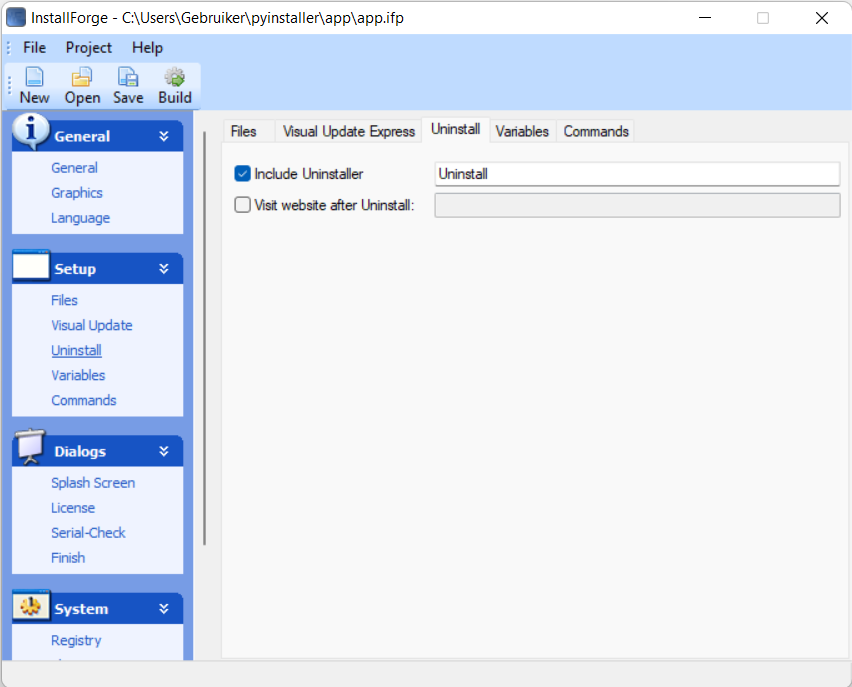 InstallForge add Uninstaller for your app
Dialogs
The "Dialogs" section can be used to show custom messages, splash screens or license information to the user. The "Finish" tab lets you control what happens once the installer is complete, and it's helpful here to give the user the option to run your program.
To do this you need to tick the box next to "Run program" and add your own application EXE into the box. Since <installpath>\ is already specified, we can just add app.exe.
 InstallForge configure optional run program on finish install
System
Under "System" select "Shortcuts" to open the shortcut editor. Here you can specify shortcuts for both the Start Menu and Desktop if you like.
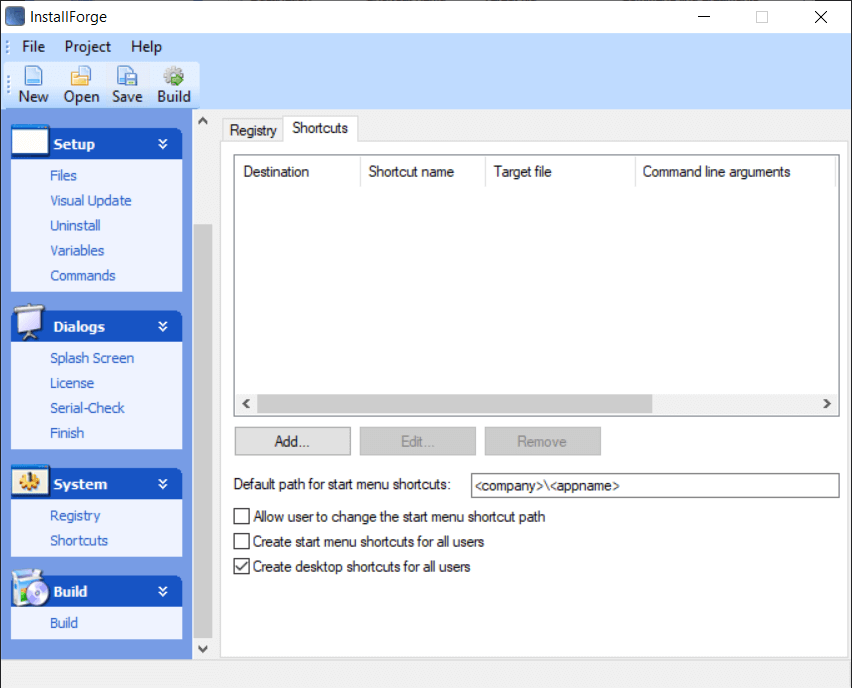 InstallForge configure Shortcuts, for Start Menu and Desktop
Click "Add…" to add new shortcuts for your application. Choose between Start menu and Desktop shortcuts, and fill in the name and target file. This is the path your application EXE will end up at once installed. Since <installpath>\ is already specified, you simply need to add your application's EXE name onto the end, here app.exe
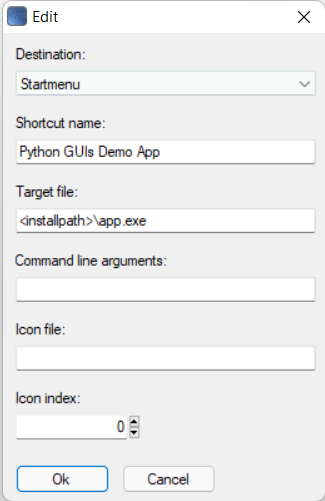 InstallForge, adding a Shortcut
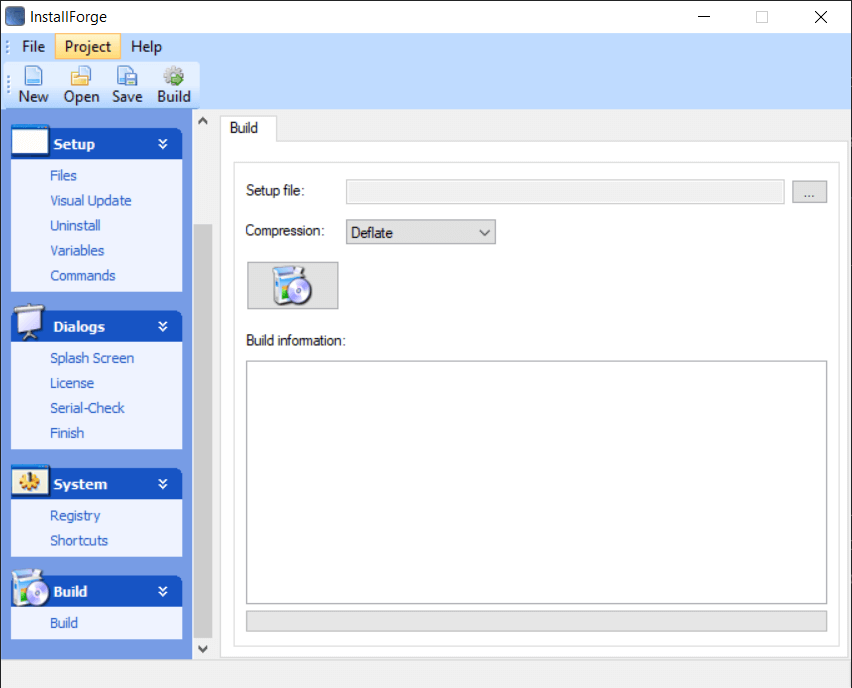
Build
With the basic settings in place, you can now build your installer.
At this point you can save your InstallForge project so you can re-build the installer from the same settings in future.
Click on the "Build" section at the bottom to open the build panel.
 InstallForge, ready to build
Click on the large icon button to start the build process. If you haven't already specified a setup file location you will be prompted for one. This is the location where you want the completed installer to be saved.
Don't save it in your dist folder.
The build process will began, collecting and compressing the files into the installer.
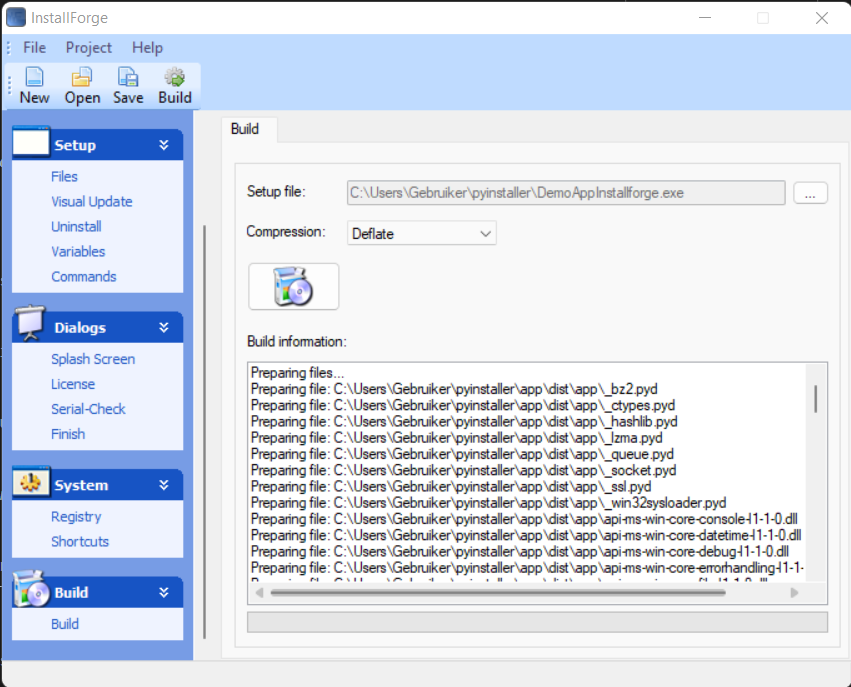 InstallForge, build complete
Once complete you will be prompted to run the installer. This is entirely optional, but a handy way to find out if it works.
Running the installer
The installer itself shouldn't have any surprises, working as expected. Depending on the options selected in InstallForge you may have extra panels or options.
 InstallForge, running the resulting installer
Step through the installer until it is complete. You can optionally run the application from the last page of the installer, or you can find it in your start menu.
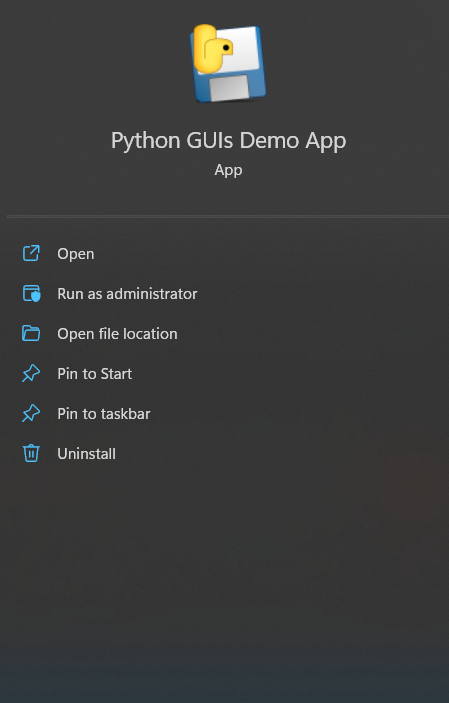 Our demo app in the Start Menu in the Start Menu on Windows 11
Wrapping up
In this tutorial we've covered how to build your PyQt5 applications into a distributable EXE using PyInstaller, including adding data files along with your code. Then we walked through the process of building the application into a Windows Installer using InstallForge. Following these steps you should be able to package up your own applications and make them available to other people.
For a complete view of all PyInstaller bundling options take a look at the PyInstaller usage documentation.
Create GUI Applications with Python & Qt6 by Martin Fitzpatrick — (PySide6 Edition) The hands-on guide to making apps with Python — Over 10,000 copies sold!
